The Ultimate Seasonal Hunting Gear Checklist for Every Season
If you want a reliable seasonal hunting gear checklist you can actually pack from, you’re in the right place. This guide organizes essentials by Spring, Summer, Autumn/Fall, and Winter—then layers on quick modifiers for waterfowl, big game, and upland/small game. It also includes global callouts for the Northern Hemisphere (U.S./Canada) and the Southern Hemisphere (Australia/New Zealand), where seasons flip. Always verify local regulations before heading out—state, provincial, refuge, and landowner rules can change.
Before You Pack: Safety, Regulations, and Planning (Seasonal Hunting Gear Checklist Foundations)
Hunting safely starts with understanding local rules and conditions. For visibility expectations during firearm big-game seasons, some U.S. states mandate fluorescent orange or pink garments (for example, New York’s deer/bear firearm hunts and Ohio’s gun/muzzleloader deer seasons). See agency references and confirm the specifics where you hunt:
- According to New York State DEC’s current big-game guidance, fluorescent orange/pink apparel is required for hunters pursuing deer or bear with a firearm; check the exact garment options in the 2025–2026 guide: see the DEC’s big game regulations summary and recent rule changes for details via the DEC deer and bear regulations overview and the DEC updates to hunting rules (2025).
- Ohio requires hunter orange during designated deer gun and muzzleloader seasons; confirm garment types/timelines in the current booklet via the Ohio hunting regulations hub (2025–26).
If you hunt on federal refuges in the U.S., each unit may have unique, station-specific rules. The U.S. Fish & Wildlife Service publishes annual updates; check the listed refuge’s rule text before you go using the National Wildlife Refuge System 2025–2026 station-specific regulations.
For Canadian context, blaze-orange mandates can differ by province. As one example, British Columbia’s synopsis emphasizes safety but has not historically maintained a single, province-wide blaze-orange mandate. Treat this as a verification cue and review the 2024–2026 synopsis directly: British Columbia Hunting & Trapping Regulations Synopsis (2024–2026).
In Australia, many states recommend high-visibility clothing for deer and other hunts, even when not legally required. Victoria’s Game Management Authority highlights wearing bright-colored garments for safety; learn more in Victoria GMA’s ethical hunting advice for deer. Always check your state’s wildlife authority site for current rules.
Finally, plan for environmental hazards:
- Ticks and biting insects: the CDC recommends EPA-registered repellents, protective clothing, and tick checks; review guidance in the CDC’s arbovirus and tick-bite prevention overview.
- Heat: hydration, pacing, shade, and sun protection matter; see CDC/NIOSH guidance on heat stress prevention.
- Cold: recognize and prevent hypothermia/frostbite; pack insulating layers and waterproof shells; review the CDC’s cold-weather safety overview.
Spring — Wet trails, turkey talk, and small game
Spring hunts often mean cool mornings, wet brush, and active birds. Think breathable layers, reliable rain protection, quiet fabrics, and tick mitigation.
Quick-Check
- Waterproof-breathable shell and lightweight rain pants for wet brush
- Uninsulated or lightly insulated boots with aggressive traction
- Turkey call set and decoy; ear/eye protection
- Tick/insect protocol: long sleeves/pants, permethrin-treated clothing or repellent
- Compact trauma kit, headlamp, dry storage for calls/ammo
Core Kit (with selection tips)
- Layering system: moisture-wicking base, light mid-layer, waterproof-breathable shell. Prioritize quiet face fabrics that won’t rasp during draws or mounting a shotgun.
- Rain gear: packable jacket and pants; look for full-length zips or thigh vents to dump heat on climbs.
- Footwear: uninsulated or 200–400 g boots for active walking; favor ankle support and wet-traction outsoles.
- Gloves/hat: thin, dexterous gloves; brimmed cap or boonie for drizzle and sun transitions.
- Navigation: GPS/phone with offline maps, compass, and paper backup; spare power bank.
- First-aid/trauma: compact kit with pressure bandage and gloves; add blister and tick-removal tools.
- Dry storage: small dry bag or hard-shell dry box for calls, tags, and license.
Waterfowl modifier (where open)
- Waders: breathable models excel in mild temps; add underlayers as needed.
- Blind bag: waterproof or highly water-resistant design; segregate shells and small items.
- Decoys/calls: travel-light spread; keep a compact repair/rigging kit.
Big-game modifier
- Optics: 8x–10x binoculars in a chest harness; rangefinder for spring bear where legal.
- Scent control: wash/storage routine; avoid scent-laden snack trash.
- Pack-out readiness: game bags, lightweight drag or simple frame pack.
Upland & small game modifier
- Miles-on-feet mindset: breathable pants, light vest with hydration sleeve, blister kit.
- Dog kit (if applicable): collar, leads, first-aid for pads, water collapsible bowl.
FAQ — Do I need rain pants in spring turkey?
If you’ll be kneeling or sitting in damp vegetation, yes—pack rain pants. Choose quiet, soft-faced fabric and thigh vents; stow them when the sun breaks through.
Summer — Heat, bugs, scouting, and early seasons
Summer is about controlling heat and sun while staying ready for early small-game or hog hunts where legal. Hydration, UPF layers, and breathable footwear take center stage.
Quick-Check
- UPF-rated long-sleeve shirt and neck gaiter; broad-spectrum sunscreen
- Lightweight, breathable pants/shorts; bug net or head net where necessary
- Hydration: 2–3 L capacity; electrolytes for long, hot days
- Ultralight footwear with grippy tread; spare socks
- Compact first-aid/heat kit; emergency comms in remote terrain
Core Kit (with selection tips)
- Sun/heat layers: light-colored, vented UPF shirts that dry fast; airy caps with neck shade.
- Footwear: trail shoes or uninsulated boots with breathable uppers; prioritize traction on dusty, loose ground.
- Hydration: bladder or bottles to reach 2–3 L; add electrolyte tabs on high-output days.
- Insect defense: permethrin-treated clothing or topical repellents; consider a head net in heavy swarms.
- Navigation: phone GPS with heat/air-quality monitoring; keep a power bank shaded to prevent thermal shutdown.
- First-aid/heat: bandages, moleskin, electrolytes, instant cold packs; watch for cramping and dizziness.
Waterfowl modifier (off-season skills/maintenance in many regions)
- Duck hunting gear checklist — blind-bag practice: organize shells, calls, spare chokes, headlamp, and hand warmers in a waterproof bag; note gaps for fall.
- Maintain gear: inspect and patch waders, re-rig decoy lines, replace rusty hardware.
Big-game modifier
- Deer hunting essentials for summer scouting: compact tripod, lightweight binoculars, rangefinder; mark wind patterns and travel corridors.
- Trail cam workflow (where legal): spare SD cards, lock boxes, silica packs; gloves to reduce scent.
Upland & small game modifier
- Early-season small game: breathable upland vest, light gloves, low-cut boots.
- Dog management: heat breaks, shade tarp, water and electrolyte powder approved by your vet.
FAQ — What to pack for a half-day summer scout?
Bring UPF layers, 1–2 L of water minimum, electrolytes, light footwear, binoculars, phone/GPS, a small first-aid kit, sunscreen, bug repellent, and a notebook for patterns. Keep it under ~15–20 L.
Autumn/Fall — Your seasonal hunting gear checklist for peak action
Fall compresses big-game, waterfowl, and upland opportunities. Plan for changeable weather: frosty dawn, windy midday, drizzly evening. Versatile layers, reliable footwear, and species-specific add-ons make the difference.
Quick-Check
- Versatile layering: breathable base, warm mid, waterproof/windproof shell
- Midweight boots with traction; choose insulation by activity level rather than a fixed number
- Optics and rangefinder; license, tags, and harvest kit
- Blaze/hi-vis where required or recommended; verify your state or land rules
- Waterproof storage for essentials; headlamp with fresh batteries
Core Kit (with selection tips)
- Layering: pair a mid-weight fleece or synthetic mid-layer with a dependable waterproof-breathable shell. Pack a light puffy for long sits.
- Footwear: choose insulation qualitatively for your conditions and effort (for example, lightly insulated boots for active still-hunts; higher-insulation pac-style boots for long, static sits). Prioritize fit and traction over chasing a gram number.
- Gloves/hat: wind-resistant gloves you can shoot in; beanie and brimmed cap to manage changing temps and glare.
- Navigation: map/compass backup to your phone GPS; spare power.
- First-aid/trauma: tourniquet plus pressure bandage, tape, and blister care.
- Game care: durable game bags, fixed or replaceable-blade knife, nitrile gloves, flagging tape where legal.
Waterfowl modifier — waders, blind-bag essentials, and decoy pragmatics
- Waders: breathable for walk-ins and mild temps; neoprene shines in near/below-freezing conditions.
- Duck hunting gear checklist — blind-bag essentials: shells, calls, headlamp, hand warmers, shooting glasses, small tool kit, and snacks. Organization improves safety and pace; see examples in Ducks Unlimited’s gear features on blind-bag organization.
- Decoys and rigging: mix floaters by species; carry a compact anchor/line kit and a quick-fix repair set.
Big-game modifier — visibility, stands, and pack-out
- Deer hunting essentials, visibility edition: requirements vary by state and season. For reference points on firearm deer seasons, review the New York DEC deer/bear apparel overview and the Ohio 2025–26 regulations hub, then confirm locally.
- Stand vs. spot-and-stalk: bring a warm sit-layer if stationary; trekking poles if climbing and side-hilling.
- Pack-out: 30–50 L day-plus pack with frame or meat-shelf; game bags, paracord, and a sturdy drag.
Upland & small game modifier — miles and dog care
- Boots: supportive, grippy soles; prioritize ankle stability for uneven fields and coulees.
- Vest: shell loops, rear game pouch, hydration sleeve; carry a compact dog-first-aid kit and extra water.
FAQ — Duck hunting gear checklist: blind-bag essentials (quick list)
- Shells in a waterproof compartment, at least one spare choke and wrench, calls on a lanyard, headlamp with spare batteries, hand warmers, shooting glasses, compact multi-tool, small dry box for license/keys, thermos, and a few cable ties or tape for emergency repairs.
Regional callouts
- Northern Hemisphere (U.S./Canada): Fall concentrates firearm deer seasons and waterfowl migrations; visibility rules often tighten. Federal refuges can impose additional limits—check the USFWS station-specific rule set.
- Southern Hemisphere (Australia/New Zealand): Your equivalent conditions arrive in late autumn and winter months; high-visibility is widely recommended for deer (e.g., Victoria GMA’s ethical hunting guidance). Always verify state permissions and seasons.
Winter — Cold snaps, static sits, and safety margins
Winter hunts demand serious insulation, moisture control, and emergency readiness. Think thermal bases, windproof insulation, fully waterproof shells, pac boots, and redundant lights.
Quick-Check
- Thermal base layers, high-loft mid-layers, and a robust waterproof-breathable shell
- Pac boots and thick merino/synthetic socks; spare socks in a dry bag
- Hand/foot warmers, windproof mitts, and a warm beanie/balaclava
- Hypothermia/frostbite prevention mindset; hot drinks and calorie-dense snacks
- Emergency comms and route plan left with a trusted contact
Core Kit (with selection tips)
- Layering: prioritize moisture management—stay dry to stay warm. Add a windproof insulated layer for glassing or stand time.
- Footwear: pac or heavily insulated boots for static hunts; keep gaiters for deep snow or slush.
- Gloves: liner gloves plus over-mitts for the sit; swap to dexterous gloves for shooting.
- Protection kit: chemical warmers, spare dry gloves/hat, thermos.
- Navigation and comms: in remote terrain, two-way satellite messengers provide SOS and texting beyond cell range; compare device types and plans via REI’s overview of PLBs vs. satellite messengers.
- First-aid/trauma: add hypothermia wrap guidance to your kit notes; know local emergency numbers.
Waterfowl modifier — late-season specifics
- Waders: neoprene (5 mm) or insulated breathable models; carry a patch kit and spare belt.
- Blind comfort: hand muff, seat pad, and a dry bag for backup layers.
- Ice tools: small spud bar or paddle for skim ice; traction aids for slick banks.
Big-game modifier — stand vs. still-hunt
- Stand: extra puffy or heated vest; insulated seat and wind block.
- Still-hunt: manage sweat with careful pace; open pit zips proactively and swap base layers if soaked.
Upland & small game modifier — short, safe windows
- Dress for short, high-output bursts; protect extremities and rotate gloves.
- Watch dog paws on ice and crust; booties and pad balm can help.
Regional callouts
- Northern Hemisphere (U.S./Canada): Static rifle sits and late waterfowl can mean sub-freezing spells—plan redundant heat sources and a conservative timeline.
- Southern Hemisphere (Australia/New Zealand): Your coldest stalks align with mid-year months; high-visibility is commonly recommended even without a legal mandate—verify per state.
Packing Examples by Season (Global callouts)
- Northern Hemisphere Fall, public-land ducks, walk-in day hunt
- Core: breathable waders, waterproof shell, warm mid-layer, midweight boots, headlamp, compact trauma kit, dry box for license/keys.
- Waterfowl add-ons: blind bag with shells/calls/chokes, compact spread of floaters, decoy lines and anchors, thermos, hand warmers.
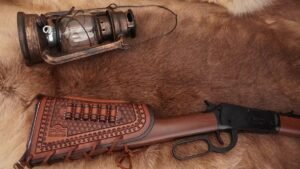
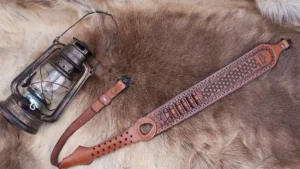
- Practical note: A leather duck strap such as Ebnoxven can help keep birds secure and organized during the pack-out while leaving hands free for decoys and shotgun.
- Southern Hemisphere Winter, sambar deer day stalk (Victoria bush, mixed weather)
- Core: thermal base, windproof insulated mid-layer, waterproof shell, pac boots, gaiters, rangefinder, map/compass, hot drink.
- Big-game add-ons: chest rig or bino harness, game bags, flagging tape where legal, trekking poles for steep descents.
- Regional cue: Wear bright colors for visibility per state guidance (e.g., Victoria GMA recommends hi-vis for safety); confirm permissions and season dates.
- Remote multi-day winter predator set (Northern plains)
- Core: high-loft layering system, waterproof shell, heavily insulated boots, stove for hot meals, spare batteries stored warm.
- Safety: two-way satellite messenger for SOS and weather texts; leave an itinerary. Compare device options and subscription models using REI’s PLB vs. satellite messenger guide.
- Logistics: 30–50 L pack with a meat shelf, sled or toboggan for snow, extra hand/foot warmers.
Care, Organization, and Off-Season Prep
Good organization protects gear and speeds your setup when it counts.
- Ammo and choke management: keep shotshells in dry boxes or waterproof blind-bag compartments; carry a labeled case for choke tubes and a wrench. A small multi-tool and a strip of tape solve more problems than you’d expect.
- Leather care: for slings and straps, brush off grit, wipe with a slightly damp cloth, let dry away from direct heat, and condition with a neutral leather balm per manufacturer guidance.
- Wader maintenance: rinse mud and grit, hang dry inside-out first, then outside; inspect for pinholes and patch proactively with the maker’s adhesive/patch kit.
- Fabric layers: launder technical garments per label; avoid heavy fabric softeners that can hinder wicking or DWR performance.
- Storage rotation: keep a seasonal bin for each hunt style (waterfowl blind bag items together; upland vest stocked with shells and dog kit). Refresh batteries and repack first-aid items before each season starts.
How to Size Packs and Set Carry Volumes
Hunting packs mirror backpacking volumes but add meat-haul features. For most day hunts, a 21–35 L capacity carries water, layers, and essentials comfortably. For 1–3 days, 30–50 L works if you pack tight and weather is moderate; bulkier winter kits or multi-day trips may push you beyond that. Review trip-length capacity guidelines in the REI backpacking pack capacity explainer and adapt for your species, terrain, and season.
Final thoughts
Use these seasonal checklists as living templates. Save them, print them, and adjust for your species, terrain, and weather. Most importantly, verify your local regulations—state or provincial rulebooks, refuge postings, and landowner stipulations—before every hunt. Pack with intention, keep safety first, and enjoy the work and the wonder that each season brings.